

How to save money when using a render farm? I will share a lot of tips that can apply for most render farms and some tips for specific ones.
How to save money when using a render farm? In this post, I will share a lot of tips for doing so.
Sometimes, things don’t go as you expected when rendering on a render farm. What are issues you may encounter?
- The render farm renders your scenes longer than the estimated time in the cost calculator.
- The bill is higher than estimated in the cost calculator of the render farm.
- Failed or incorrect frames.
- Trouble in uploading/downloading to/from the render farm, and some more.
Regarding render farm costs, I have some tips to help you save money when using a render farm. All the tips below can apply to most of the render farms. I also share some exclusive tips for a specific render farm as they are the render farm’s unique features.
Tips to save money when using a render farm
Okay, move on to the main section today. There are six tips to help you save money when using a render farm. All of them can apply to most render farms.
1. Optimize your scene
Optimizing your scene is an efficient way to dramatically shorten render time, and enhance image quality. This leads to quicker rendering, not only saving costs on render farm services but also improving local rendering efficiency.
While additional components and elements may not make noticeable visual improvements, they can substantially increase rendering time. And longer render time means more money to pay on a render farm. So, you should use only the necessary scene components and elements – such as polygons, rays, samples, lights, subdivisions, etc – to save both time and cost.
There are many ways to optimize your scene. Take a look below:
- Reduce the polygon count in your meshes, subdivision surfaces, generators, cloners, instances, and NURBs.
- Use fewer individual lights and set them in such a way that they illuminate the scene more easily with fewer ray bounces. Or use uniform lighting that covers a greater area, such as Sky or HDRI.
- Simplify your materials without sacrificing quality: Limit trace depths in reflections/refractions and optimize materials that allow the ray count to explode.
- Optimize your render settings: limit ray bounces, set cut-off thresholds, use adaptive sampling, clamp ray intensity, reduce your AOVs, and use faster GI settings.
Besides, an optimized scene is less likely to cause rendering issues than an unoptimized one.
2. Make sure your scene has no error
When rendering a scene, you may encounter a variety of problems. Any rendering problem can cause your overall render time to lengthen excessively, go on indefinitely, or even crash. That would be a complete waste of money on a render farm.
Rendering issues are usually caused by something within the scene, for example:
- Render settings
- Material/Map
- Geometry
- Light
- 3rd party plugin
- Imported assets, etc.
Sometimes, rendering issues may be caused by software bugs or hardware failure. Or incompatibility of your software, plugin version with the version on the render farm.
As a result, it is necessary to inspect your scene and address technical issues (if any). Otherwise, rendering a troublesome scene on a render farm will be a waste of money.
In addition, many render farms offer plugins that can check your scene and warn you of any errors before you upload it to the farm.
3. Test before rendering
Though you have properly optimized and checked your scene, this does not guarantee that you will not come across any issues when rendering on a render farm. So, you should always do a test render.
The way you do it is to render a smaller resolution version of your image or render a few sample frames from your animation.
For stills: render a smaller version of your final image, for example, 1/10th of the final resolution.
For animations:
- Render a smaller version of your final animation, for example, 1/10th of the final resolution.
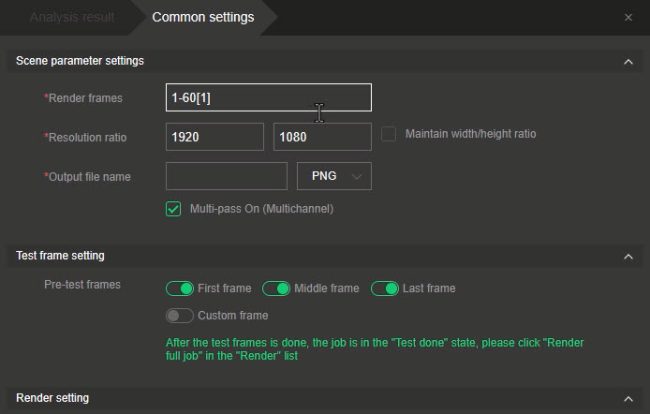
- Render some frames from your animation. For example, Fox Renderfarm enables you to select pre-test frames: First frame, Middle frame, Last frame, or Custom frame.
- Render consecutive frames from your animation. For example, 5 consecutive frames.
If the test renders are of satisfactory quality, you can render the complete image or animation at the intended full resolution.
4. Use low priority, configuration
Most render farms offer pricing plans that you can select to render your scene. Saas render farms often offer priority choices while IaaS render farms provide nodes with different configurations.
Priority – SaaS render farms
Render farms usually offer three priorities: Low, Medium, and High. (Rebusfarm is an exception, it offers 8 priorities: Standard, +1 to +7).
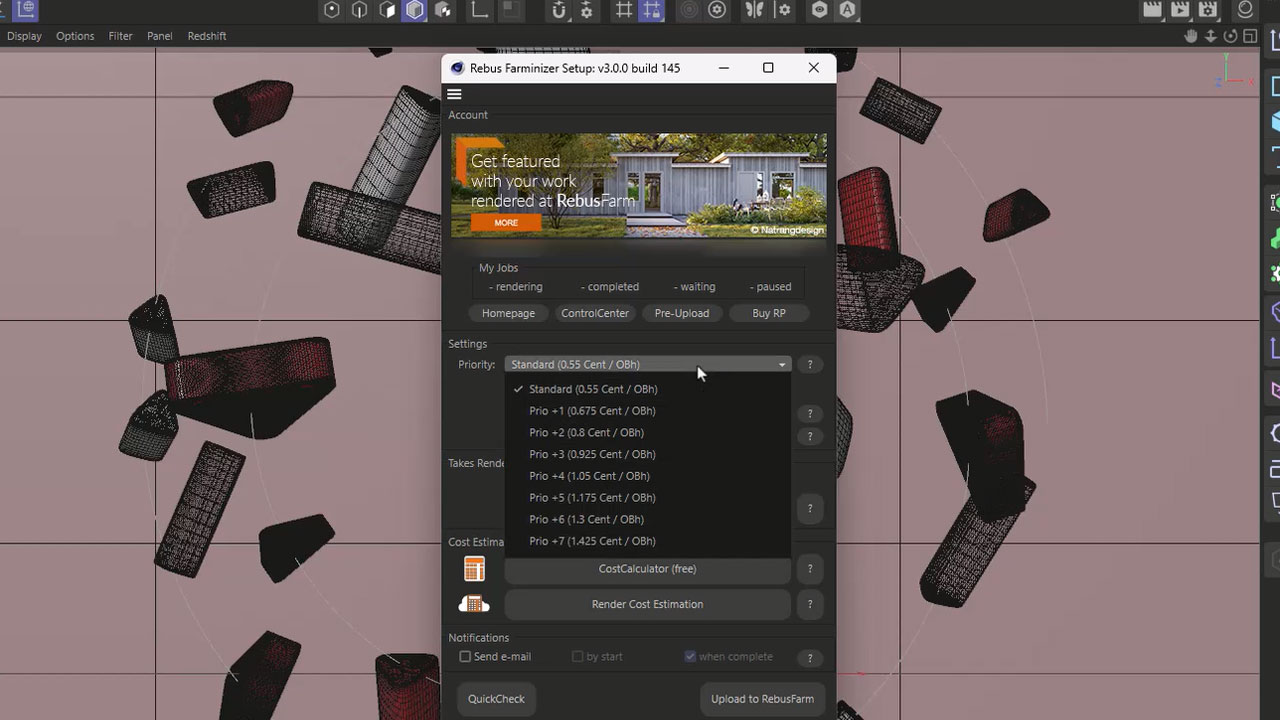
Each priority comes with a different set of features and has a different price. The higher the priority, the faster the rendering, but the higher the cost.
Configuration – IaaS render farms
IaaS render farms (such as iRender) typically provide nodes with different configurations. The higher configuration, the faster rendering, and usually the higher cost.
Therefore, if time constraint is not your concern, you should choose a low priority or a node with a low configuration to save money.
5. Call for help whenever needed
When you run into rendering problems, it is better to call for help, rather than try to work it out on your own. Because time saved is money conserved.
Many render farms have a support and technical team that is available 24/7 via various channels such as Email, Live chat, Skype, and Phone.
6. Make use of free credits and bonus credits
Trial credits and bonus credits are another effective way to save money when using a render farm. You can use them to test renders or even render a small project. Bonuses and discounts from special events are also a bargain. Render more with the same purchase.
Advanced tips for specific render farms
You can learn how to use a render farm very quickly, but to take advantage of it – takes time. I have used several render farms and found their exclusive features.
Other than the 6 tips above, there are extra tips for specific render farms such as Garagefarm and iRender. (I will update the post when I find out any new tricks of any render farms).
Garagefarm
Garagefarm provides a feature called Frames per execution or FPE for short. This option is only accessible for animation.
The FPE option enables you to render many frames in a row on a single node. If FPE is set to 1, each frame will be rendered as an individual job. In other words, every time a new frame begins, the scene is loaded on each node. If FPE is set to 5, 5 frames will be rendered in a row on one node.
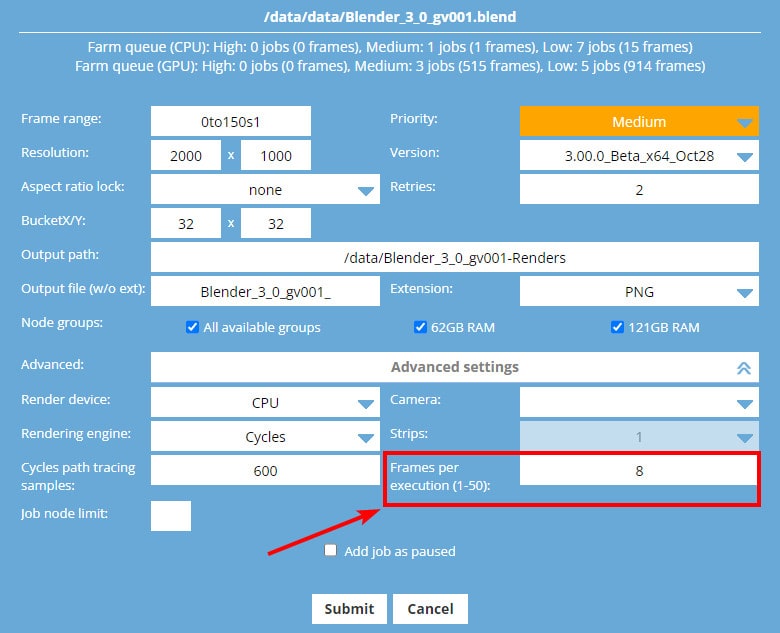
So, how can the FPE help you save money?
Let’s say, you have a project that takes a long time to load but renders quickly. So, having all the nodes load the same project and render just 1 or a few frames is inefficient and time-consuming, leading to a waste of money. In this case, you should set a greater FPE for the project to be rendered on fewer nodes. This way, not all the nodes need to open the heavy file, which saves significant loading time and your money as well.
In contrast, if your project loads quickly but renders slowly, it is ideal to set the FPE at 1. Then you will have as many nodes as possible to render your project simultaneously.
iRender
iRender is an IaaS render farm in which you will rent their remote servers and render your scenes. It is pretty similar to having another PC remotely (for temporary of course).
You will pay for the time you use its server. So, it is better to only use the server for rendering, and limit other time-consuming tasks.
Those tricks are what I learned and summed up from using iRender:
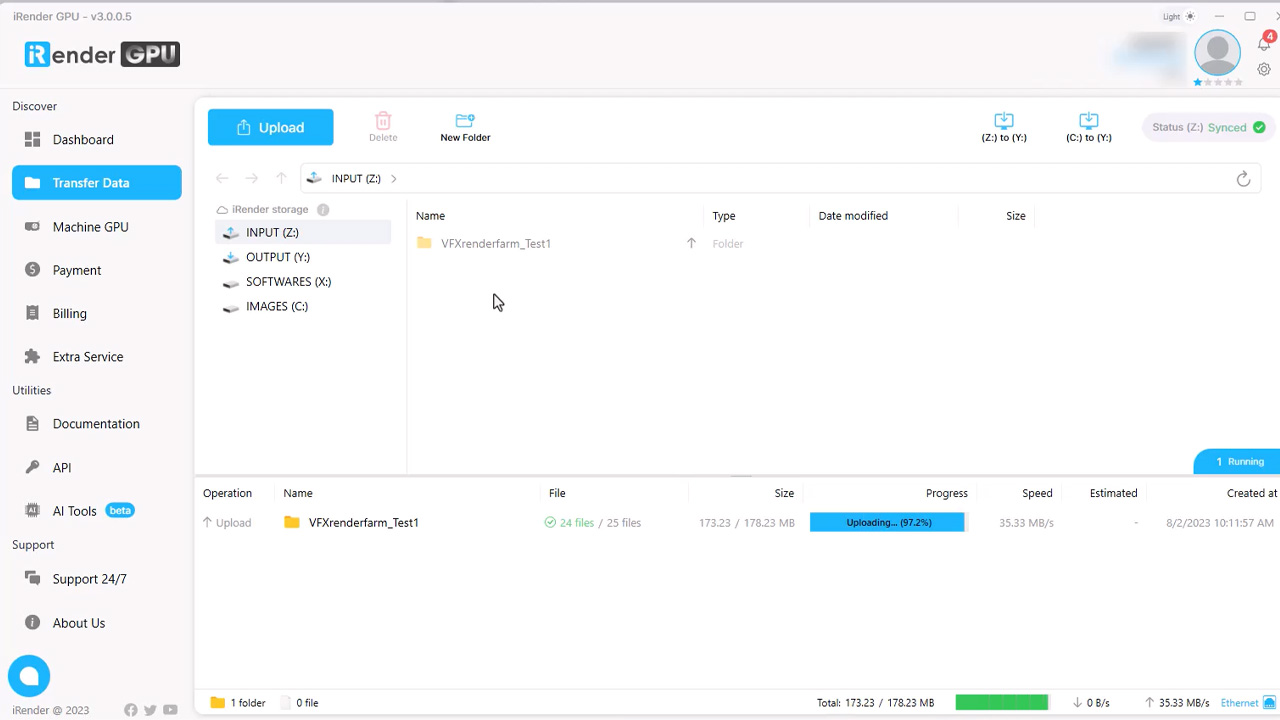
- Use iRender’s app for uploading scenes and downloading results.
- Only boot the machine after you upload your scene and it has finished synchronization to the server (check the status in iRender’s app).
- When the render is complete, shut down the machine right away. Then you can download the final output from iRender’s app.
Final thoughts
You can learn how to use a render farm very quickly, but to take advantage of it – takes time. Hopefully, my tips and tricks in this post will shorten your learning curve with render farms. Most importantly, helps you save money when using a render farm.
COMMENTS